 Save
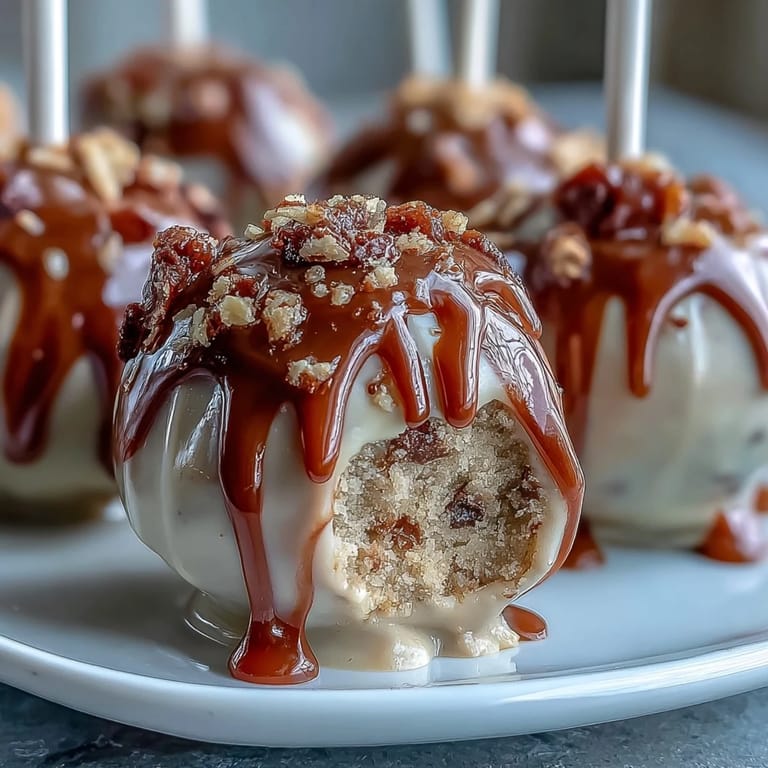
Save My sister's graduation party was three weeks away when she casually mentioned wanting something that screamed school spirit without the fuss of a full tiered cake. I was in the kitchen that afternoon, cake mix box in hand, when it hit me—cake pops in her school colors with gold accents would be perfect. What started as a quick Pinterest scroll turned into two hours of rolling, dipping, and decorating, and by the time I arranged them in a tower, even my cake-skeptical brother admitted they looked almost too good to eat.
I'll never forget watching my niece's face when she saw the full display—twenty-four perfectly coated pops standing in formation, each one gleaming with gold. Her friends started grabbing them before I'd even finished arranging, and within minutes, they were gone. That's when I realized it wasn't just the taste; it was the thoughtfulness baked right into them, the fact that someone had taken time to make something that said, "I see you, and I'm celebrating you."
Ingredients
- Vanilla or chocolate cake mix (1 box, about 400 g): Don't skip the quality here—a good cake mix becomes the foundation for everything that follows, and it honestly doesn't taste like a shortcut once you work your magic with the frosting.
- Unsalted butter (1/2 cup, softened): Room temperature is non-negotiable; cold butter won't cream properly and your frosting will be lumpy and sad.
- Powdered sugar (1 1/2 cups): This creates the sweetness and structure that holds your cake balls together—sift it if you have time to avoid clumps.
- Milk (1 tablespoon): This small amount loosens the frosting just enough without making it weepy.
- Vanilla extract (1 teaspoon): Use real vanilla if you can; it makes a subtle but noticeable difference in the final taste.
- Salt (pinch): This tiny amount balances the sweetness and makes the vanilla sing.
- Candy melts in two school colors (450 g total): These are your canvas—they melt smoothly and set quickly, which is why they're better than regular chocolate for this project.
- Vegetable shortening or coconut oil (2 tablespoons, optional): If your candy melts seem thick or grainy, this thins them out just enough for a silky dip without affecting taste.
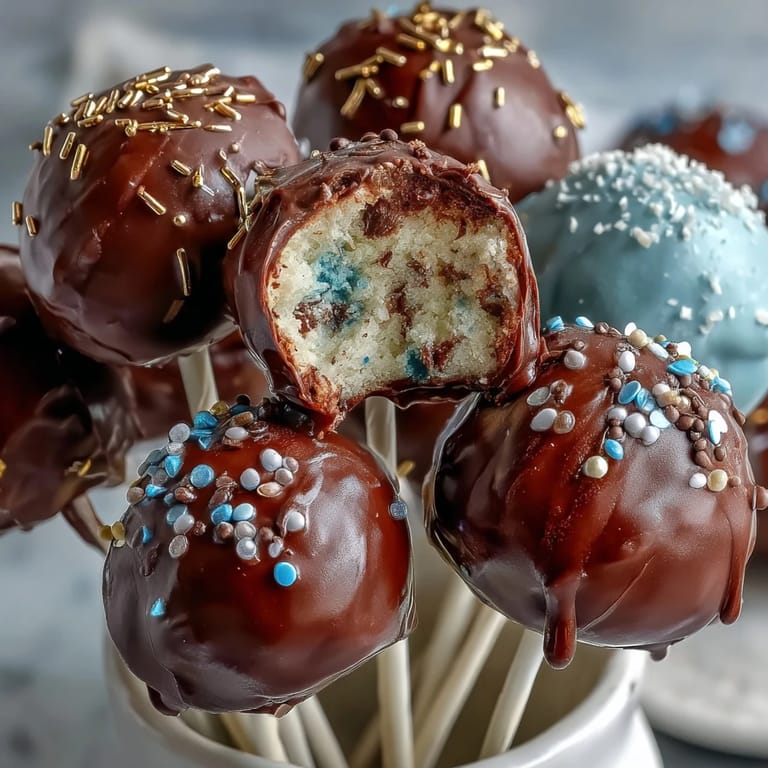
- Gold sprinkles or edible glitter: Apply while the coating is still tacky, or they'll slide right off—trust me on this one.
- Lollipop sticks (24): Wooden ones work fine, but if you can find the thicker paper ones, they hold up better in the coating.
- Styrofoam block: This serves as your drying station; you could also use a clean, empty egg carton in a pinch.
Tired of Takeout? 🥡
Get 10 meals you can make faster than delivery arrives. Seriously.
One email. No spam. Unsubscribe anytime.
Instructions
- Bake your cake base:
- Follow the package directions exactly, and don't skip letting it cool completely—I learned this the hard way when I tried to crumble warm cake and ended up with a gluey mess. Once it's cool enough to touch comfortably, you're ready to move forward.
- Whip up the frosting:
- Start with softened butter and beat it until it's pale and creamy, about a minute on medium speed. Gradually add the powdered sugar so you don't end up with a cloud of white dust in your kitchen, then add milk, vanilla, and salt, beating until it's smooth and light.
- Mix cake and frosting together:
- Crumble the cooled cake into a large bowl—really break it down into fine crumbs, almost like wet sand. Add frosting slowly, mixing with your hands, until the mixture just barely holds together when you squeeze it; too much frosting and your pops become dense and heavy.
- Roll into balls:
- Use a tablespoon or small cookie scoop to keep them uniform in size, then roll between your palms until they're smooth. This is meditative work—put on music and enjoy the rhythm of it.
- Chill them properly:
- Spread the balls on a parchment-lined baking sheet and refrigerate for at least an hour; if you're in a hurry, the freezer works in thirty minutes. Cold balls are firm and hold their shape when dipped, which is the whole key to success.
- Secure your sticks:
- Dip each stick into a small amount of melted candy coating and push it halfway into a chilled cake ball, rotating gently as you insert it. This little anchor keeps the pop from spinning around during the final dip.
- Melt and dip with precision:
- Heat your first color of candy melts according to package instructions, adding shortening if the mixture looks thick or grainy. Hold the stick and dip the entire cake pop with one smooth motion, then gently tap off the excess coating so you get a thin, even layer.
- Add the gold while wet:
- Immediately after dipping, sprinkle or dust with gold accents while the candy is still tacky—this is your only window. If you wait even a minute, the coating sets and the sprinkles won't stick.
- Let them dry standing up:
- Place each finished pop upright in your Styrofoam block, stick-side down. The coating sets as it sits, which is why you need that vertical position; it keeps the coating smooth and prevents the chocolate from pooling at the bottom.
- Finish and display:
- Once the coating is completely hard, you can stack them, package them, or arrange them on a platter. They're sturdy enough to handle at this point and taste even better after sitting for a few hours as the flavors settle together.
 Save
Save What struck me most wasn't the technical side of making these—it was the moment when my sister's friends started taking photos of them. Suddenly these little treats became part of the memory, something tangible they could take with them and remember the day by. That's when I understood why people go to the effort for things like this.
Choosing Your Colors Right
Pick school colors that have enough contrast to show up clearly when you dip them—if your school colors are navy and light blue, one might disappear into the other. I learned this by watching a friend make maroon and brown pops that looked almost identical from a distance. Test your color combinations on white paper first, and if the contrast feels weak, consider using one main color with gold as the dominant accent instead.
Storage and Transport Tips
Room temperature storage works best because the coating stays glossy; refrigeration can make them look cloudy and dull. If you need to transport them to a party, use a sturdy box with tissue paper as cushioning, and keep them standing upright the whole way. They'll survive a short car ride just fine, and arriving intact is worth the careful packing.
Make Them Your Own
Chocolate cake mix creates a richer, more elegant look, while vanilla gives you a lighter feel—both work beautifully. You could even add a touch of almond extract to the frosting for depth, or use lemon cake mix paired with a hint of lemon zest stirred into the frosting. The foundation is solid enough that you can play with flavors without worrying about the structure failing you.
- Try tying thin ribbons in school colors around each stick for extra flair.
- Metallic edible paint brushed on after dipping creates custom designs if you're feeling artistic.
- Make a few extra as backups, because these disappear faster than you'd expect.
 Save
Save These cake pops have a way of turning a party into something memorable—not just because they taste good, but because they say someone cared enough to make them. Every celebration deserves something handmade and thoughtful.
Recipe Guide
- → How do I prevent cake pops from cracking?
Ensure the cake crumbs and frosting are well combined but not overly wet. Chilling the shaped pops helps maintain firmness during dipping.
- → Can I use different cake flavors for these pops?
Absolutely. Vanilla, chocolate, or any preferred cake flavor works well and pairs nicely with various coating colors.
- → What’s the best way to get a smooth coating?
Adding a small amount of vegetable shortening or coconut oil to melted candy melts helps achieve a smooth, glossy finish.
- → How long should cake pops chill before dipping?
Chilling the shaped balls for at least one hour or freezing for 30 minutes firms them, making the coating process easier.
- → Can I decorate beyond gold sprinkles?
Yes, you can add ribbons around the sticks or use other edible decorations that complement the color theme.