 Save
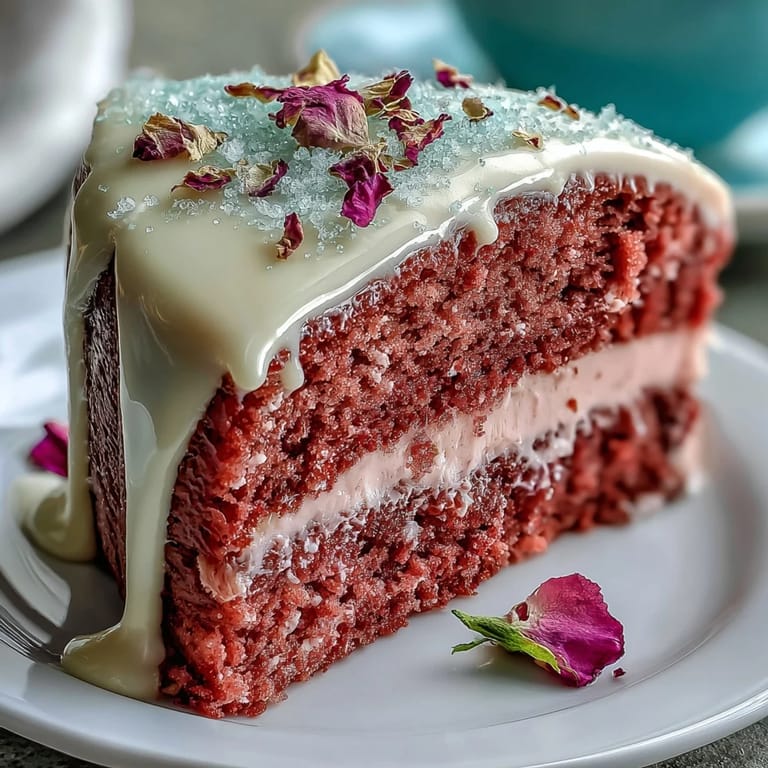
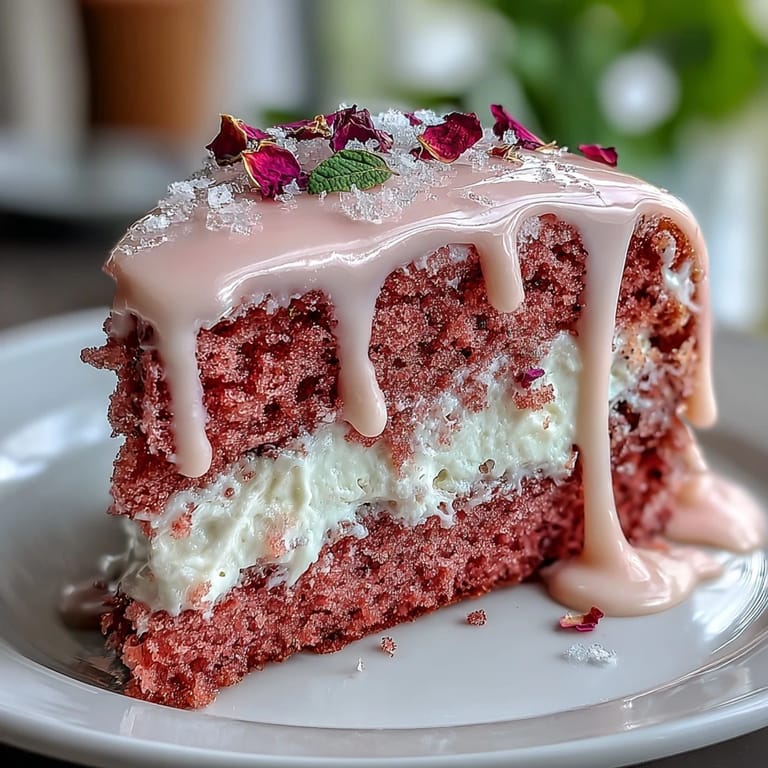
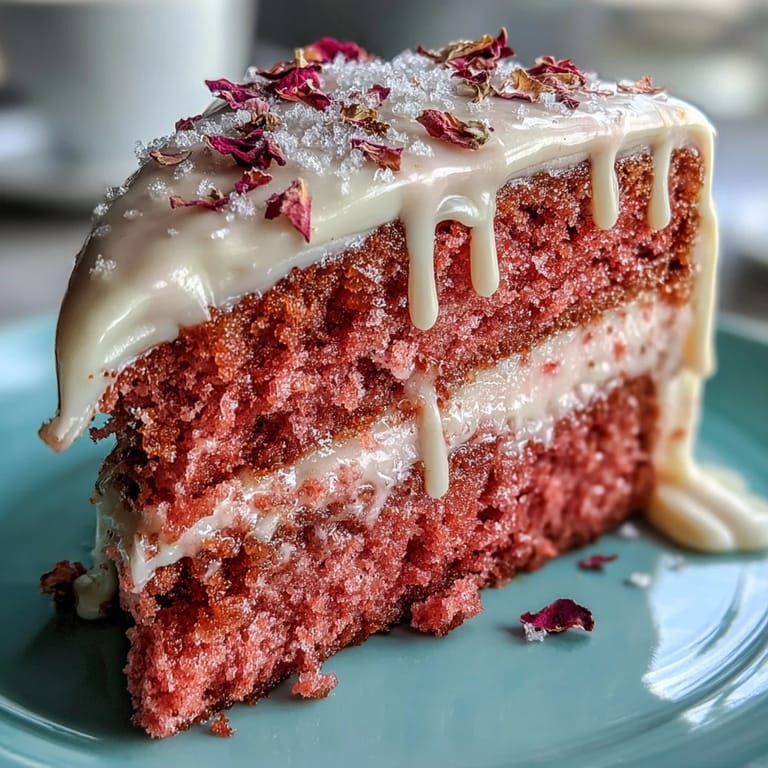
Save I’ll never forget the little cloud of shimmer that hung in the air the first time I made this Rosé Velvet Cake—gold luster whirling like fairy dust, and my kitchen suddenly felt like the set of an opulent celebration. Somewhere between sneaking just a taste of buttercream and measuring out pink drops of food coloring, I realized this was nothing like any ordinary cake. Rosé in a cake seemed a bit extravagant, but the way the aroma floats up as the layers bake makes it feel utterly justified. There’s a sparkle to this cake—quite literally—but it’s the process of building those soft, rose-tinted tiers and gilding everything with that gold drip that brings out a bit of magic in the everyday. It might look showy, but the reward is as much in the baking as in the first slice shared.
The day before my best friend's bridal shower, I found myself piping generous swirls of the buttercream, the kitchen table crowded with ribbon and well wishes. There was laughter and last-minute playlist mishaps streaming in from the next room, but I only paused to let the cakes fully cool (a hard-won lesson). I remember thinking how much fun it was to play with edible gold paint—nervously at first, then grinning when I realized a little mess just meant more sparkle.
Ingredients
- All-purpose flour: I always sift this first—it's the secret to those irresistibly tender layers, and prevents any sneaky lumps.
- Granulated sugar: The sweetness balances the tart rosé without making things cloying; I use superfine for an even crumb.
- Baking soda: Just a little is enough to lift the batter into a delicate crumb; always measure with a gentle hand.
- Fine salt: A tiny pinch heightens all the other flavors (a lesson from oversalting only once).
- Unsweetened cocoa powder: Don’t skip this touch—a hint of cocoa deepens the flavor and supports the rose color.
- Vegetable oil: This is what makes velvet cake so plush; I opt for neutral oil so nothing competes with the wine aroma.
- Large eggs: Room temperature is key! Cold eggs will keep the batter from mixing evenly.
- Buttermilk: Tangy, creamy, and makes the cake super moist; let it warm up to avoid curdling with the oil.
- Rosé wine: Dry or sparkling both work—choose one you’d actually drink, as its flavor lingers in every bite.
- Vanilla extract: A gentle floral balance for the wine's brightness; I always use pure vanilla.
- White vinegar: This isn’t for tang, but to wake up the baking soda and give the cake that memorable velvet texture.
- Pink or rose gel food coloring: Start with a tiny amount and add more—you can always intensify, but you can’t take it back.
- Unsalted butter: The buttercream only shines if it’s truly soft; let it get dreamy at room temp for best results.
- Powdered sugar: Sift, sift, sift—it saves you from elbow-aching lumps and makes the frosting satiny.
- Heavy cream: Just a spoonful helps melt the white chocolate smoothly for drips that actually drip.
- Edible gold luster dust: This is the moment for a little drama—make sure yours is food-safe and go for the boldest shimmer.
- Vodka or clear lemon extract: It evaporates quickly, leaving only shine behind; water makes the paint streaky, so don’t risk it.
Tired of Takeout? 🥡
Get 10 meals you can make faster than delivery arrives. Seriously.
One email. No spam. Unsubscribe anytime.
Instructions
- Get set up:
- Preheat your oven to 350°F and line three cake pans with parchment—it’s a little fussy now, but worth it when the layers pop free, golden and intact.
- Mix dry ingredients:
- Whisk or sift together flour, sugar, baking soda, salt, and cocoa until completely combined; take a moment to admire how the cocoa just barely tints the mix.
- Blend wet ingredients:
- In another bowl, whisk the oil, eggs, buttermilk, rosé, vanilla, and vinegar until smooth; the buttermilk gives a soft creamy hue and the wine will make you curious.
- Combine and tint:
- Pour wet into dry and mix until just blended—avoid overmixing. Then, swirl in gel food coloring slowly, stopping once you love the rosy-pink shade.
- Bake the cakes:
- Evenly divide batter between pans and bake 30-35 minutes; the kitchen will fill with a faintly floral scent and cakes should spring back to touch.
- Cool and prep layers:
- Let cakes rest in pans for 10 minutes before transferring to a rack; resist decorating until completely cool, no matter how tempted.
- Make the buttercream:
- Beat butter high until cloud-fluffy, then add powdered sugar cup by cup, scraping down the bowl; drizzle in rosé and vanilla to taste, adjusting consistency if needed.
- Assemble and crumb coat:
- Level the layers if needed for a stately stack, then fill and frost the assembled cake with a thin crumb coat; chill for at least 20 minutes.
- Final icing:
- Spread the remaining buttercream over the chilled cake—go slow and enjoy swirling the surface to your taste.
- Create the gold drip:
- Melt white chocolate and cream together until smooth; let cool so it thickens enough to drip but not run off the cake entirely.
- Paint the gold:
- Once the drips are set, mix edible gold dust with a drop of vodka or extract, then brush gently (but with conviction) over each drip for a luxurious finish.
- Decorate and delight:
- Add rose petals, berries, or extra shimmer as your heart desires. Slice and serve when everyone’s ready for a bit of drama.
 Save
Save Watching my friends take those first bites in a sunlit kitchen, someone humming behind me and a scattering of rose petals on the counter, I realized this cake is about marking bright beginnings. Sometimes baking really is the best way to celebrate the people you love—even if your gold paint ends up everywhere but the cake.
How to Tweak for a Crowd or Small Batch
This recipe scales simply—when I needed a mini version for an engagement dessert box, I halved the ingredients and baked in two small pans with perfect results. For a grand celebration, doubling the recipe and staggering bake times is the only adjustment needed; just allow a few extra minutes in the oven for larger layers. Leftover buttercream can be frozen and thawed for another occasion—the flavor only improves.
Making the Gold Drip Fool-Proof
The trickiest part for me has always been the gold drip, but a little patience pays off: I always test the drip on a glass before using it on the cake. If it sets too quickly or runs too much, just adjust with a touch more cream or a minute of cooling. And when painting, go for bold brushstrokes—the effect is dazzling, not dainty.
When It’s Worth the Effort
Every time I make this cake, someone asks if it’s tricky, and while it takes a little patience, the look on everyone’s face makes it worthwhile. Plus, it’s surprisingly forgiving once you realize the few splatters of luster dust only add charm.
- Plan to decorate on parchment so you can sweep away the glittery evidence.
- Let the whole cake chill if your kitchen is warm—it makes painting easier.
- If using fresh florals, check for edible varieties and wrap stems in floral tape first.
 Save
Save I hope your kitchen ends up dusted with a little gold and laughter too—this cake is all about making moments shimmer. Don’t forget, a bit of extra sparkle never hurt anyone.
Recipe Guide
- → Can I use sparkling rosé?
Yes. Use a dry or sparkling rosé for a subtle floral note; avoid overly sweet bottles. Taste the batter and adjust sweetness if needed to keep balance.
- → How do I keep the buttercream from becoming too soft?
Beat butter until light, add sifted sugar gradually, and chill the cake between coats. Keep butter at cool room temperature and add more sugar to firm or a splash of rosé to loosen as needed.
- → What’s the trick for a smooth, controlled gold drip?
Melt white chocolate with cream and cool slightly before pouring; the drip should be warm, not hot. Chill the cake first so the drip sets quickly, then paint with edible gold once set.
- → Can the cake be made ahead?
Yes. You can bake and assemble a day ahead, storing the cake refrigerated in a box. Bring to room temperature before serving and add delicate decorations just before display.
- → How do I get even, level layers?
Weigh or evenly divide batter into pans and bake on the same rack. Cool, trim domes with a serrated knife, and use a thin crumb coat before final frosting for straight sides.
- → Is edible gold safe to use?
Use only food-grade luster dust or edible gold leaf labeled for consumption. Avoid non-edible metallic paints and always check ingredient labels for safety.