 Save
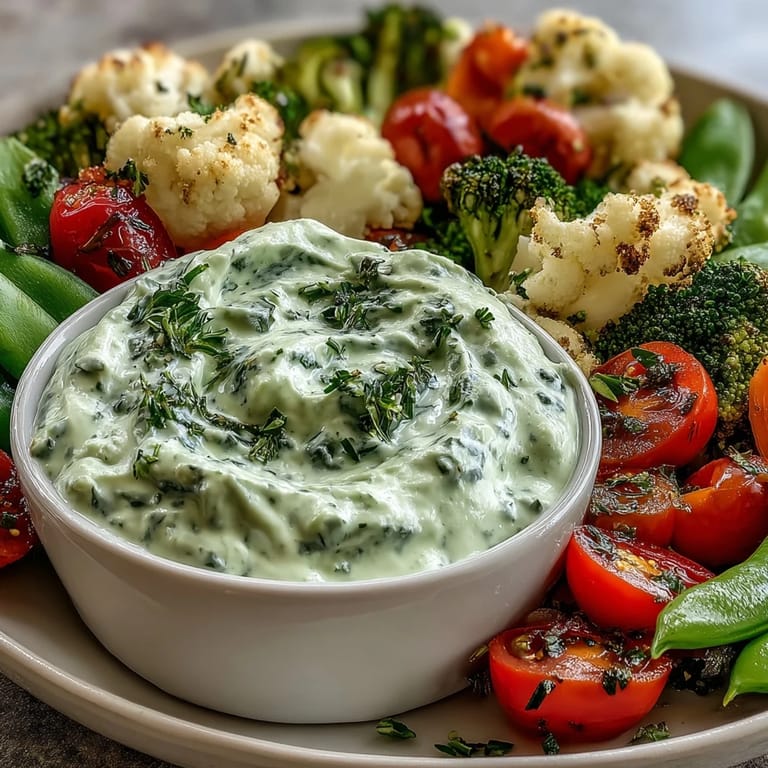
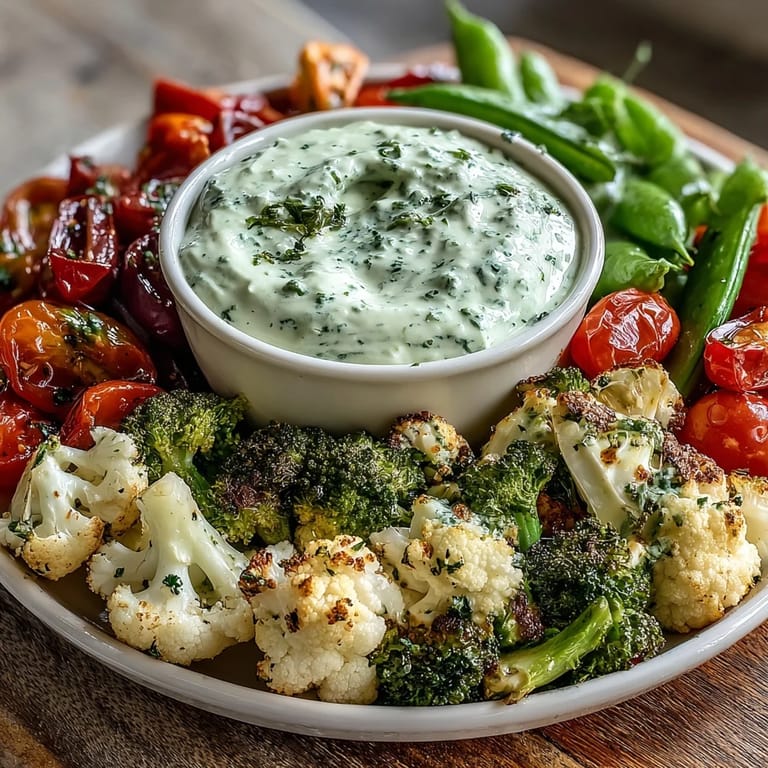
Save My neighbor showed up at my door with her three-year-old in tow, both looking a bit frazzled from an afternoon of errands. She asked if I had anything quick the kids might actually eat, and I realized my fridge was bursting with fresh vegetables I'd bought with good intentions. Twenty minutes later, we had this platter spread across my kitchen island, and watching those little hands reach for the bright colors instead of the usual crackers felt like a small victory. The Green Goddess dip was the real magic, though—creamy, herbaceous, and somehow making broccoli seem like the most exciting thing in the world.
I made this for my daughter's soccer team's end-of-season potluck, and it disappeared faster than anything else on the table. One parent pulled me aside afterward asking for the dip recipe, which made me laugh because it's so simple most people assume there's some secret ingredient I'm holding back. The combination of those fresh herbs with a hint of anchovy (which nobody even realizes is in there) creates this savory depth that just works.
Ingredients
- Baby carrots: Look for ones that still have their natural shape rather than the uniform baby-cut varieties, as they tend to have more flavor and snap when you bite into them.
- Snap peas: These should feel crisp and slightly firm, never limp, so buy them as close to serving time as possible if you're being fussy about texture.
- Cherry tomatoes, halved: Halving them exposes the seeds which release more flavor and makes them less likely to roll around on the platter.
- Cucumber slices: English cucumbers have fewer seeds and thinner skins, making them easier to eat raw and more visually appealing.
- Broccoli and cauliflower florets: Cut them small enough that kids can grab them easily, about the size of a wine cork, and they'll feel less intimidating.
- Yellow bell pepper, sliced: The yellow ones are actually sweeter than red or green, which matters when you're trying to appeal to younger palates.
- Radishes, sliced: These add a peppery crunch that prevents the platter from feeling monotonous, and they look beautiful when you slice them thin.
- Greek yogurt: Full-fat Greek yogurt creates a creamier base than the nonfat varieties, and it actually has better flavor too.
- Mayonnaise: I use the kind made with avocado oil now, but honestly any quality mayo works as long as it's fresh.
- Fresh herbs (parsley, chives, tarragon, basil): Buy these the day you're making the dip if possible because dried herbs just don't have the same brightness and the whole point is that vibrant green goddess color.
- Garlic clove, minced: Use fresh garlic, never the jarred stuff, because the difference is honestly night and day in a simple dip like this.
- Anchovy fillets: These are optional but they add an umami complexity that makes people wonder what the secret ingredient is even though it's not fishy tasting at all.
- Lemon juice: Fresh lemon, squeezed right before you make the dip, brightens everything and prevents the herbs from turning dark.
- Dijon mustard: Just a teaspoon adds tang and helps emulsify the dip so it stays smooth and creamy.
- Salt and pepper: Taste as you go because fresh herbs vary in intensity and you might need more seasoning than you think.
Tired of Takeout? 🥡
Get 10 meals you can make faster than delivery arrives. Seriously.
One email. No spam. Unsubscribe anytime.
Instructions
- Wash and arrange your vegetables:
- Rinse everything under cold water and pat dry with a clean kitchen towel because wet vegetables won't hold the dip as well and the platter will look soggy. Arrange them in clusters by color, starting with the brightest hues on the outer edge and working toward the center, creating visual sections that guide people's eyes naturally around the platter.
- Make the Green Goddess dip:
- In a medium bowl, combine the Greek yogurt and mayonnaise first, whisking until completely smooth before adding the herbs. Once the base is creamy, stir in the parsley, chives, tarragon, and basil, then add the minced garlic, anchovy fillets if using, lemon juice, and Dijon mustard, stirring until everything is evenly distributed and the dip has turned a gorgeous green color.
- Season to taste:
- Add salt and pepper gradually, tasting after each pinch, because the yogurt and mayo already contribute some saltiness. Remember that the dip will taste slightly saltier the next day, so err on the side of undersalting at first.
- Transfer and serve:
- Pour the dip into a small serving bowl and nestle it into the center of your vegetable platter, or create a shallow well with the vegetables and place the bowl there if your platter has room. If you're making this ahead, cover everything with plastic wrap and refrigerate, then take it out about ten minutes before serving so the dip isn't ice cold.
 Save
Save There's something about watching someone's face light up when they taste homemade dip for the first time and realize how different it is from the store-bought versions. My husband actually asked me to make this weekly now, which is hilarious because he used to turn his nose up at vegetable platters entirely.
The Art of Platter Assembly
The way you arrange the vegetables matters more than you might think, not just for Instagram purposes but because people eat with their eyes first. I learned this the hard way when I threw vegetables on a platter randomly and half of them remained untouched, but when I created intentional color groupings and made sure no two similar colors sat next to each other, the vegetables actually got eaten. The radish slices look especially striking against the green broccoli, and the yellow pepper creates a natural break that draws the eye around the platter in a satisfying way.
Making It Your Own
While this recipe is perfect as written, the vegetables are really just your canvas and you should feel free to swap in whatever is fresh and seasonal where you are. I've made versions with blanched green beans, roasted beets, baby corn, and even sliced fennel, and the dip works beautifully with all of them. The only vegetables I'd avoid are overly watery ones like regular tomatoes or iceberg lettuce, which tend to get soggy and slide around.
Storage and Make-Ahead Tips
This platter is genuinely better when you give the dip a few hours (or overnight) in the fridge to let the flavors meld together. The vegetables can be prepped and stored in containers the morning of serving, then assembled just before your guests arrive so everything looks fresh and crisp. If you're making the dip ahead, store it in an airtight container and give it a good stir before serving because the herbs tend to settle.
- Cut vegetables can be kept in airtight containers in the fridge for up to two days before they start losing their crunch.
- The dip actually tastes better the next day, so don't hesitate to make it a day early for dinner parties or events.
- If you're transporting this to a party, keep the dip and vegetables separate until you arrive so everything stays crisp and the colors don't bleed.
 Save
Save There's real joy in feeding people food that's both nourishing and genuinely delicious, and this platter manages both without any fuss or complicated technique. Keep this recipe in your back pocket for whenever you need something that looks impressive, tastes incredible, and comes together faster than you'd think possible.
Recipe Guide
- → What vegetables are included in the platter?
The platter features baby carrots, snap peas, cherry tomatoes, cucumber slices, broccoli and cauliflower florets, yellow bell pepper, and sliced radishes.
- → How is the Green Goddess dip made?
The dip combines Greek yogurt, mayonnaise, fresh parsley, chives, tarragon, basil, garlic, optional anchovy fillets, lemon juice, Dijon mustard, salt, and pepper whisked until smooth.
- → Can the dip be made vegan?
Yes, by substituting Greek yogurt and mayonnaise with plant-based alternatives, the dip can easily be made vegan without losing its creamy texture.
- → What tools are needed to prepare this platter?
A sharp knife, cutting board, mixing bowl, whisk or spoon, and serving platter with a small bowl for the dip are required.
- → How should the platter be served or stored?
Arrange the fresh vegetables on a platter, place the dip in the center, and serve immediately or cover and refrigerate until ready to enjoy.