 Save
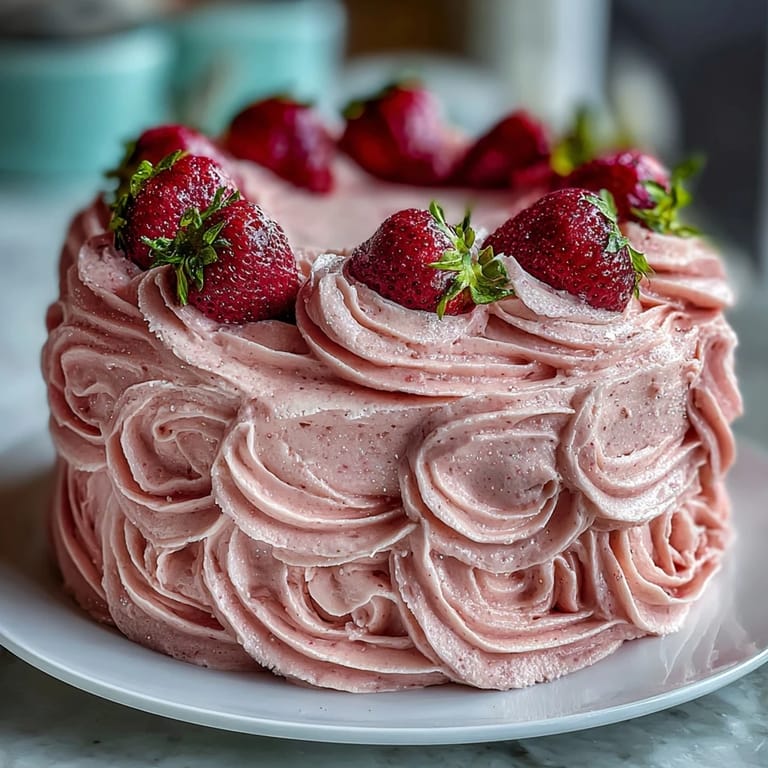
Save My friend texted me a photo of a Valentine's cake she'd seen online—those impossible pink ombre layers caught my eye immediately. I spent an embarrassing amount of time staring at it, imagining the moment someone's face lights up when they see something that beautiful on their plate. That's when I realized this wasn't just about the cake; it was about creating something that feels like a love letter in dessert form. So I decided to build my own version, learning as I went, and honestly, the process became just as rewarding as the result.
I made this cake for my coworker's retirement party, and watching her eyes widen when she walked into the break room—the way everyone gasped a little at the gradient pink frosting—that moment justified every minute spent leveling cake layers and piping in sections. Someone actually asked if I'd ordered it from a professional bakery, which felt like the highest compliment a home baker can receive.
Ingredients
- All-purpose flour (2 1/2 cups): Use fresh flour that hasn't been sitting in your cabinet for years, as older flour absorbs less liquid and can lead to dense cakes.
- Baking powder (2 1/2 tsp): This is your insurance policy for a light, tender crumb; don't skip it or halve it thinking you're being healthy about your baking.
- Fine salt (1/2 tsp): It amplifies sweetness and flavor complexity, so don't omit it even though it seems like an insignificant amount.
- Unsalted butter (2 cups total): The two separate portions—one for cake, one for frosting—must both be at room temperature or you'll fight during mixing.
- Granulated sugar (2 cups): Creaming this with butter is where you trap air into the batter, so don't rush the mixing.
- Large eggs (4): Room temperature eggs blend seamlessly into the batter without breaking the emulsion, so take them out of the fridge while you prep.
- Pure vanilla extract (2 tsp total): The real stuff makes a noticeable difference in flavor depth compared to imitation.
- Whole milk (1 cup): Room temperature is key here; cold milk can seize the batter and create a separated, curdled texture.
- Powdered sugar (4 cups, sifted): Sifting removes lumps before you start mixing, which prevents grainy buttercream that won't spread smoothly.
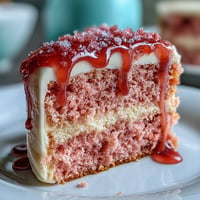
- Freeze-dried strawberries (1/2 cup, finely ground): These are the secret to authentic pink color and strawberry taste without adding liquid that would thin your frosting.
- Heavy cream or milk (2 tbsp): This loosens the buttercream slightly so it spreads and layers without tearing the cake.
- Pink gel food coloring (optional): Gel coloring gives you those beautiful deep pinks without watering down your frosting like liquid food coloring would.
Tired of Takeout? 🥡
Get 10 meals you can make faster than delivery arrives. Seriously.
One email. No spam. Unsubscribe anytime.
Instructions
- Prepare Your Workspace:
- Preheat your oven to 350°F and take those three 8-inch round pans—grease them generously and line the bottoms with parchment paper. This small step prevents the heartbreak of cakes sticking to the pan when you're trying to turn them out.
- Combine Dry Ingredients:
- In a medium bowl, whisk together the flour, baking powder, and salt until they're evenly distributed and there are no lumps hiding at the bottom. This even distribution ensures every bite of cake has consistent rise and tenderness.
- Cream Butter and Sugar:
- Beat the softened butter and granulated sugar in a large bowl or stand mixer on medium-high speed for about 3 minutes until the mixture looks pale, fluffy, and almost like wet sand. Listen for the change in sound—it gets quieter and fluffier as air incorporates into the mixture.
- Incorporate Eggs One at a Time:
- Add each egg individually, beating well after each addition so it fully emulsifies into the butter mixture before the next one goes in. If you dump all four eggs at once, the batter can separate and look curdled, which compromises the final texture.
- Add Vanilla:
- Pour in the vanilla extract and mix until it disappears completely into the batter. The vanilla enhances the delicate sweetness and prevents the cake from tasting one-dimensional.
- Alternate Dry and Wet Ingredients:
- Alternate adding the flour mixture and milk in three additions—flour, milk, flour, milk, flour—mixing on low speed just until combined after each addition. Overmixing at this stage develops gluten and creates a tough, dense cake, which is the opposite of what you want.
- Divide and Bake:
- Divide the batter evenly among the three prepared pans and smooth the tops with a spatula so they bake at the same rate. Bake for 25 to 30 minutes until a toothpick inserted in the center comes out clean or with just a few moist crumbs clinging to it.
- Cool Properly:
- Let the cakes rest in their pans for 10 minutes—this allows them to set just enough to release cleanly—then turn them out onto wire racks to cool completely. Rushing this step or frosting warm cakes results in melting frosting and structural collapse.
- Make the Strawberry Buttercream:
- Beat softened butter in a large bowl until it's completely smooth and creamy, then gradually add the sifted powdered sugar and finely ground freeze-dried strawberries, mixing until no streaks of dry sugar remain. Add the cream, vanilla, and salt, then beat on medium-high for about 2 minutes until the buttercream is fluffy and spreadable.
- Create the Ombre Effect:
- Divide the buttercream into three bowls—leave one plain white, tint the second a light pink, and the third a deeper pink using gel food coloring (start with just a few drops because the color intensifies as you mix). Transfer each shade into a separate piping bag so you're ready to apply the gradient.
- Level and Layer:
- If your cake layers have domed tops, use a serrated knife or cake leveler to slice them flat so they stack evenly. Place the first layer on a serving plate and spread a thin layer of the lightest pink buttercream on top, then repeat with the remaining layers, using medium pink for the second layer and dark pink for the bottom of the top layer.
- Build the Ombre Frosting:
- Pipe or spread the darkest pink buttercream around the bottom third of the entire cake, the medium pink in the middle third, and the lightest pink on the top third and across the top. Use an offset spatula or cake scraper to gently blend where the colors meet, creating that coveted gradient effect.
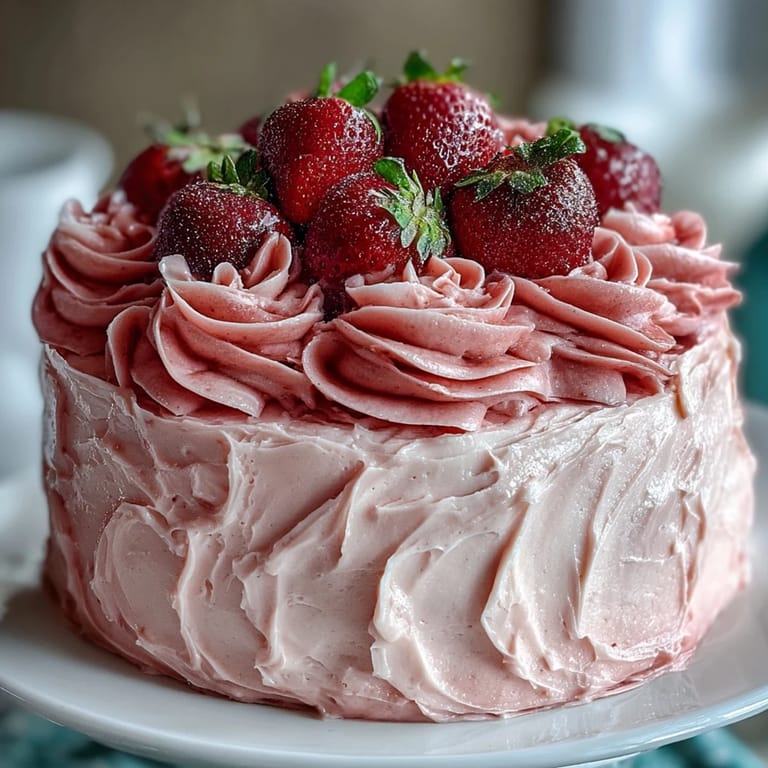
- Garnish and Chill:
- Arrange fresh strawberries on top if you're using them, and add edible glitter or sprinkles for extra sparkle, then refrigerate the whole cake for at least 30 minutes. This chill time firms up the frosting so slices come out clean and beautiful instead of smudging.
 Save
Save I still think about my neighbor knocking on my door the day after I made this cake, saying her daughter had talked about it non-stop and could I maybe teach her how to make it. We ended up baking together on a Saturday afternoon, and somewhere between the second and third bowl of buttercream, it became less about perfecting technique and more about creating a memory we'd both remember. That's when I realized the real magic of this cake isn't the ombre—it's what happens when you share it.
The Science Behind Strawberry Pink
When I first tried to make strawberry buttercream the traditional way—with fresh strawberries and puree—it turned a muddy gray-pink that looked more depressing than festive. Then I discovered freeze-dried strawberries, and everything changed. The freeze-drying process removes all the water while concentrating the flavor and natural pink pigments, so when you grind them into powder and mix them into butter and sugar, you get that gorgeous blush color that photographs like a dream. The powdered form also means you're not introducing extra moisture that would thin your frosting or make it separate.
Leveling Cake Layers Like a Professional
The first time I tried to frost a domed cake layer without leveling it, the whole thing tilted like the Leaning Tower of Pisa halfway through decorating. Now I always slice off those domes with a serrated knife or a cake leveler, which takes maybe a minute and completely transforms how your layers stack and look when sliced. If you don't have a leveler, a long serrated bread knife and a steady hand work just fine—the goal is a flat surface so each layer sits securely on the one below it.
Making This Cake Your Own
This vanilla cake is a perfect canvas for whatever flavors call to you, and I've experimented with variations that surprised me in the best way.
- Add a thin layer of strawberry jam between the cake layers if you want to punch up the strawberry flavor and add moisture.
- Make the cake up to a month ahead by wrapping cooled layers in plastic wrap and freezing them; frost it the day you need to serve it.
- Pair slices with sparkling rosé, champagne, or a light fruity cocktail to make the celebration feel complete and intentional.
 Save
Save This cake celebrates the people and moments that matter, whether it's Valentine's Day or just a Tuesday when someone deserves to feel loved. The pretty pink ombre is the first thing people see, but the real gift is that tender crumb and the strawberry flavor that lingers just long enough to make them smile.
Recipe Guide
- → What gives the strawberry buttercream its natural pink shade?
Ground freeze-dried strawberries combined with optional gel food coloring create the pink ombre effect in the buttercream.
- → Can the cake layers be prepared in advance?
Yes, cake layers can be baked and frozen up to one month ahead to save time on assembly day.
- → What is the best way to achieve distinct ombre layers?
Divide the buttercream into portions tinted with varying intensities of pink then layer and smooth them carefully for a blended ombre look.
- → How should the cake be served for clean slices?
Chill the assembled cake for at least 30 minutes before slicing to allow the buttercream to firm up for neat layers.
- → Are there optional garnishes for this cake?
Fresh strawberries and edible glitter or sprinkles add extra decorative flair when placed atop the finished cake.