 Save
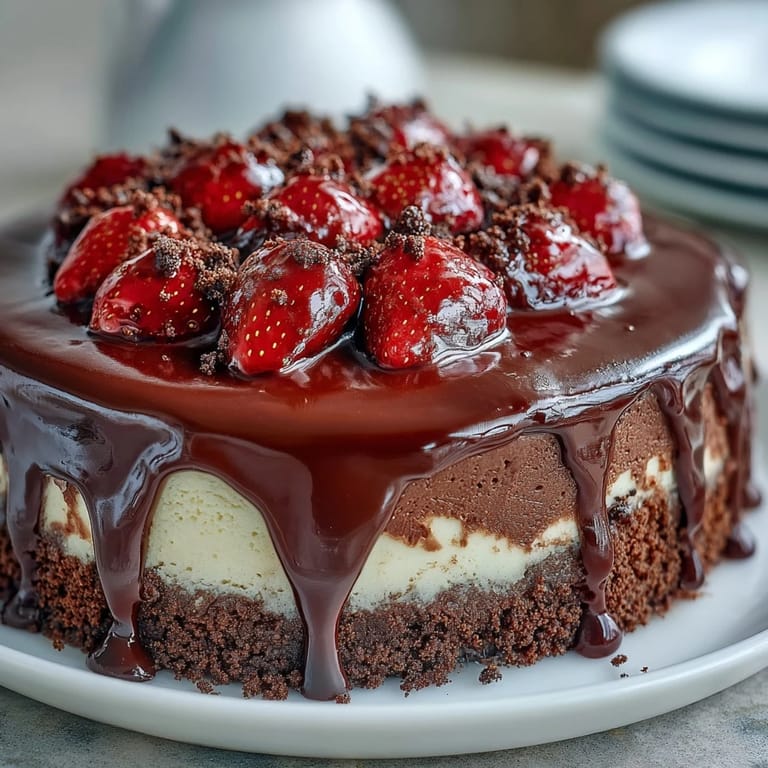
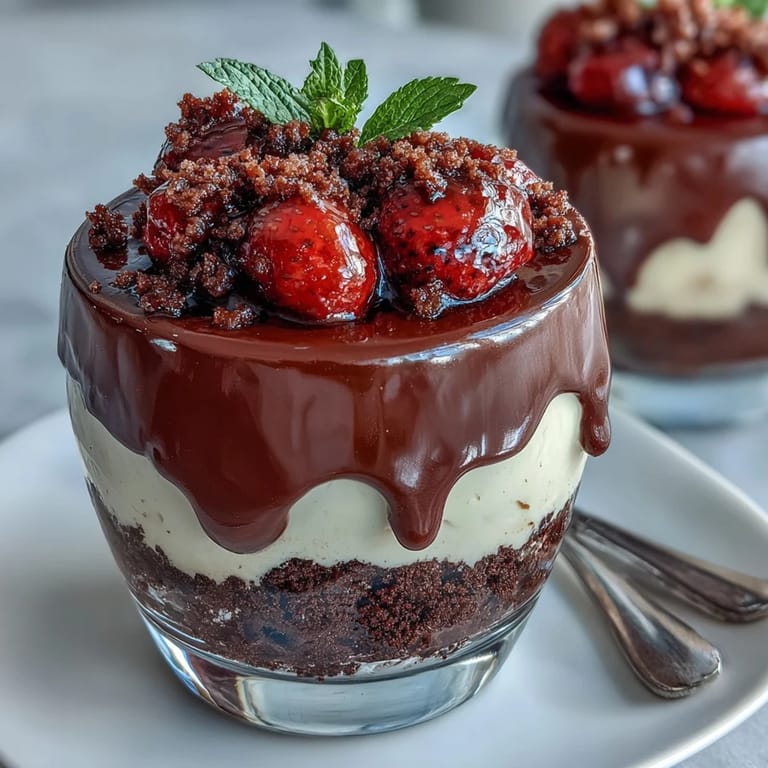
Save Last summer, I was scrolling through photos of Dubai at midnight when I landed on an image of these impossibly elegant chocolate and strawberry desserts in delicate glasses. Something about the contrast—the deep cocoa darkness against those ruby-red berries—made me want to recreate them immediately. What struck me most was how doable it seemed, yet how luxurious it looked when plated. That's when I knew this had to become my go-to dinner party dessert.
I made these for a friend who was going through a rough patch, and watching her face light up when she took that first bite—chocolate hitting her palate, then the creamy richness, then those tart strawberries—felt like I'd given her something more than dessert. She asked for the recipe three times that evening, and that's when I realized these cups had quietly become my secret weapon for turning an ordinary moment into something memorable.
Ingredients
- Chocolate digestive biscuits: These form the sturdy, flavorful foundation that won't crumble under the weight of the creamy layers above—I've learned that crushing them to varied sizes (not powder-fine) gives the best texture.
- Unsalted butter: Melted butter binds the biscuits together without adding unwanted salt that might compete with the chocolate.
- Cream cheese: Softening it to room temperature is the non-negotiable step that prevents lumps and ensures silky smoothness when you fold in the whipped cream.
- Powdered sugar: Finer than granulated, it dissolves instantly into the cream cheese without gritty pockets.
- Heavy cream: Whip it to soft peaks, not stiff peaks—this gives you a cloud-like texture that folds gently without deflating.
- Vanilla extract: Just a teaspoon of this brings out the subtle sweetness without overpowering the chocolate.
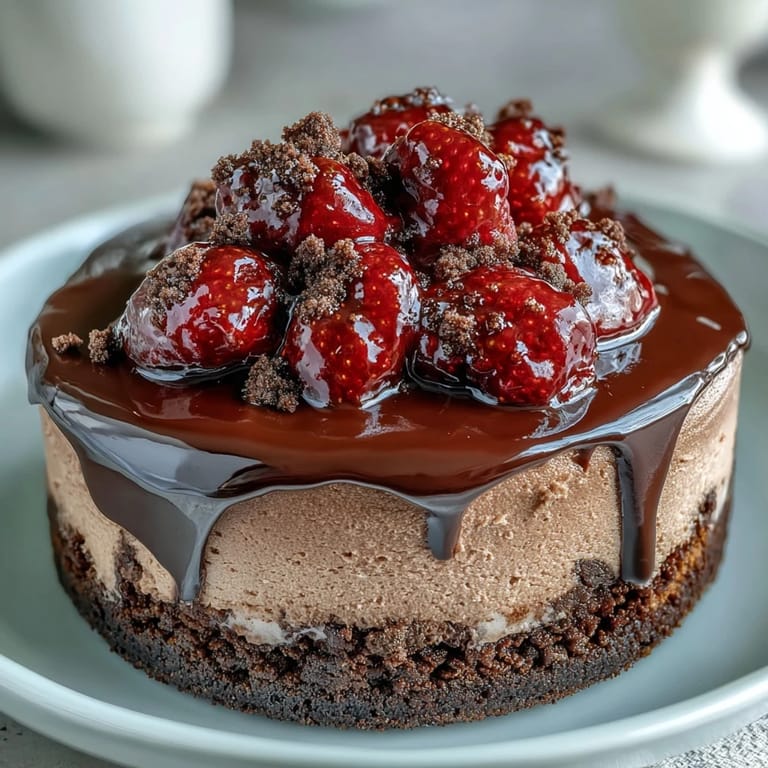
- Fresh strawberries: The jewels of this dessert; macerate them with a touch of sugar to coax out their juices and deepen their flavor.
- Dark chocolate: Use quality chocolate here because it's the final flourish—chopped fine ensures it melts evenly when the hot cream hits it.
- Garnish elements: The whole strawberry on top, chocolate shavings, and pistachios aren't just decoration; they hint at the layers hidden below and add textural contrast.
Tired of Takeout? 🥡
Get 10 meals you can make faster than delivery arrives. Seriously.
One email. No spam. Unsubscribe anytime.
Instructions
- Build Your Foundation:
- Mix your crushed biscuits with melted butter until the mixture looks like wet sand, then press it firmly into the bottom of each cup—this prevents a soggy base later. I use the back of a spoon to pack it down evenly, creating a compact layer that holds everything above it.
- Create Cloud-Like Filling:
- Beat softened cream cheese with powdered sugar until completely smooth, scraping the bowl often so no lumps hide at the edges. In another bowl, whip cold heavy cream with vanilla to soft peaks, then fold this gently into the cream cheese mixture using a spatula—fold, don't stir, to keep all that air you've worked for.
- Layer with Care:
- Spoon or pipe the cheesecake filling onto the biscuit bases, smoothing the tops so they're level and ready for the next layer. This is the moment to pause and admire your work before moving forward.
- Macerate Your Berries:
- Toss sliced strawberries with sugar and let them sit for 10 minutes—you'll watch as they release their own juices, creating a light syrup that you'll eventually drizzle back onto the layers. This step is essential because it prevents watery desserts and deepens the strawberry flavor.
- Make Silky Ganache:
- Heat heavy cream just until it begins to steam (not boil), then pour it over chopped dark chocolate and let it sit undisturbed for one minute—this pause allows the chocolate to soften gently. Stir slowly until glossy and smooth, then cool it briefly so it doesn't melt the cheesecake layer when poured.
- Layer the Strawberries and Ganache:
- Distribute macerated strawberries evenly across the cheesecake, then spoon a thin layer of cooled ganache over each cup. Think of it as sealing in all the flavors you've built.
- Chill and Set:
- Refrigerate for at least 2 hours until everything is firm and the flavors have had time to meld together in the quiet cold of your fridge.
- Garnish Before Serving:
- Top each cup with a whole strawberry, chocolate shavings using a vegetable peeler, and crushed pistachios if you're using them. This final moment of presentation transforms a homemade dessert into something that looks professionally plated.
 Save
Save There's something almost ceremonial about serving these in clear glasses—your guests can see every layer you've built with care, and that transparency somehow makes them taste even better. It's the edible equivalent of showing your work, and people genuinely appreciate the effort they can witness.
The Dubai Twist You Can Add
If you want to push these closer to authentic Dubai flavors, add a tiny pinch of ground cardamom to your cheesecake mixture—not enough to taste overtly spiced, but just enough to create an almost imperceptible warmth that makes people pause mid-bite and ask, 'What is that?'. I discovered this variation when I was experimenting with Middle Eastern spices, and it turned these from good to genuinely interesting in a way that whisper-quiet flavors often do.
Why No-Bake Is Your Friend
Beyond the obvious convenience of not heating your kitchen, no-bake desserts give you something precious: time to think and adjust. If your ganache isn't glossy enough, you can add more cream. If the cheesecake filling seems too thick, you can lighten it. There's a gentleness to this method that baking simply doesn't allow—you're working with living ingredients that forgive small mistakes and reward attention.
Storage, Advance Prep, and Flavor Development
These cups are actually better made a full 24 hours ahead because the flavors soften and integrate overnight, creating a more cohesive dessert than one freshly assembled. Keep them covered in the refrigerator so they don't absorb any stray flavors from other foods, and resist the urge to garnish until just before serving—chocolate shavings soften and pistachios lose their crunch if they sit too long.
- For a nutty variation, layer finely chopped pistachios between the biscuit base and cheesecake filling to add textural interest and a subtle earthiness.
- Use gluten-free digestive biscuits if needed, and double-check all your chocolate and cream cheese labels for hidden gluten.
- If you need to serve these beyond a single day, you can freeze them for up to one week—thaw gently in the refrigerator and garnish fresh.
 Save
Save These little cups taught me that dessert doesn't need to be complicated to be impressive, and that sometimes the most luxurious moments come from taking the simplest ingredients and treating them with quiet respect. Make them when you need to feel capable in the kitchen, or when someone else needs reminding that life still holds small, delicious joys.
Recipe Guide
- → What type of biscuits work best for the base?
Chocolate digestive biscuits or chocolate graham crackers crushed finely create a sturdy, flavorful base that complements the creamy filling.
- → Can I make these cups ahead of time?
Yes, preparing the cups up to 24 hours in advance allows the flavors to meld and the layers to set properly when refrigerated.
- → Is it necessary to macerate the strawberries?
Macerating with a bit of sugar softens the strawberries, enhancing their sweetness and adding juicy moisture to the layers.
- → How do I achieve a smooth chocolate ganache topping?
Gently heating cream and pouring it over chopped dark chocolate, then stirring until fully melted and glossy, ensures a rich, smooth ganache layer.
- → Can I add nuts for texture?
Absolutely, finely chopped pistachios between layers or as garnish provide a pleasant crunch and nutty contrast.
- → Are there any allergen concerns?
These cups contain dairy and gluten unless gluten-free biscuits are used. Nuts may be present if pistachios are added.