 Save
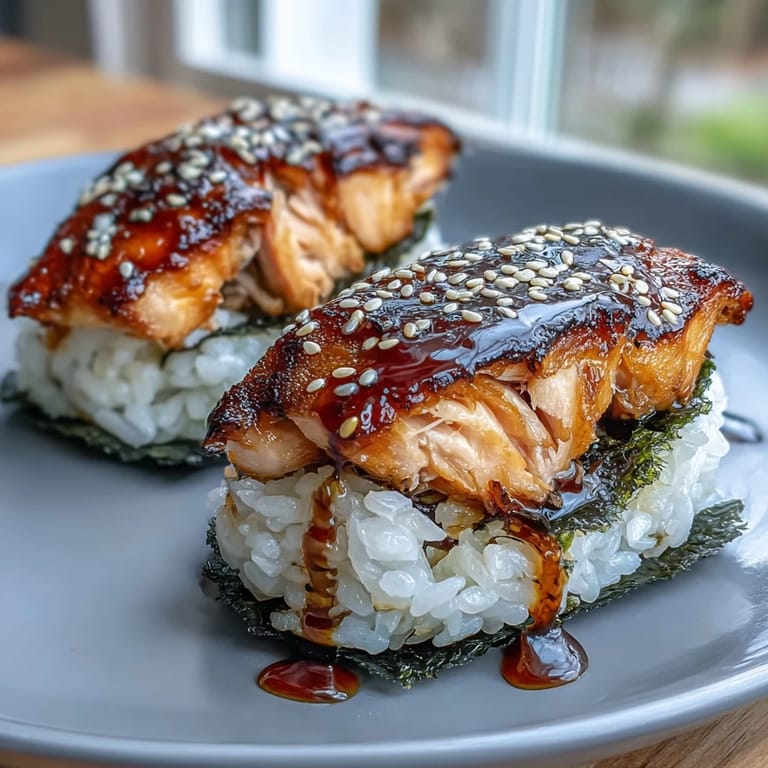
Save As steam from the rice pot rolled through my kitchen on a rainy afternoon, I realized how easily the scent of sushi rice could change my mood. There’s something quietly meditative about patting soft, sticky grains between lightly salted hands. Grilled Salmon Onigiri always brings a steady hum of activity—the gentle sizzle from the skillet, the comfort of warm rice, the salty-sweet aroma of flaked salmon mingling with sesame. At first glance, onigiri might seem simple, but they require just enough attention to anchor you in the moment. I love how the process has become as nourishing as the snack itself.
One night after a long day, I crafted a batch for friends who dropped by unexpectedly—watching them grin with every crunchy bite was better than any elaborate dinner I could’ve planned. We sat around the counter swiping stray sesame seeds off the plate, and for a while, conversation paused for the pure joy of good, simple food.
Ingredients
- Salmon fillet: Opt for fresh, skinless salmon for flakier texture and a clean flavor—removing any pin bones first saves time later.
- Soy sauce: Adds depth to the salmon marinade; I use a good-quality light soy for the cleanest taste.
- Mirin: A dash of this sweet rice wine balances out saltiness and brings a gentle gloss to the fish.
- Toasted sesame oil: Just a half teaspoon gives the salmon a nutty aroma that stands out even after grilling.
- Salt & black pepper: Use sparingly in the marinade; I learned too much salt can overpower the delicacy of the fish.
- Japanese short-grain rice: It’s essential for stickiness—long-grain won’t clump properly for shaping onigiri.
- Water: Use fresh, cold water for the fluffiest rice and measure carefully for just-sticky-enough grains.
- Rice vinegar: This is optional but I enjoy the gentle tang it provides when mixed with the finished rice.
- Nori sheets: Halved, these keep fingers dry and add that familiar umami punch; use sharp scissors for the neatest edges.
- Toasted white sesame seeds: Optional, but a sprinkle at the end adds crunch and a subtle, earthy accent.
- Water & salt for shaping: Keeping hands damp and lightly salted prevents sticking and seasons the outside of the rice just right.
Tired of Takeout? 🥡
Get 10 meals you can make faster than delivery arrives. Seriously.
One email. No spam. Unsubscribe anytime.
Instructions
- Cook the rice:
- Rinse the short-grain rice gently in cool water, swishing with your fingers until the water runs clear—this step keeps the grains from getting gummy. Let the rice soak with measured water, then steam in your rice cooker or saucepan until just tender; rest, covered, before fluffing with a wide spatula and stirring in salt and vinegar if you like a hint of tang.
- Grill the salmon fillet:
- Brush the salmon with soy, mirin, and sesame oil, then roast or grill it until the edges caramelize and the flesh flakes easily under your fork. Set it aside to cool for a few minutes—you'll want it just warm for filling the onigiri.
- Shape the onigiri:
- Keep a bowl of water and a pinch of salt nearby to moisten and season your hands, then scoop a third-cup of rice and flatten it on your palm. Spoon in some flaked salmon, carefully encase it inside, and gently press into a triangle or oval, smoothing the edges as if sculpting a little rice pillow.
- Crisp the rice balls:
- Add a thin sheen of oil to a heated nonstick skillet or grill pan, then lay in the onigiri—listen for a faint sizzle as the bottoms brown. After a couple minutes on each side, brush lightly with more soy sauce if you want extra caramelization and depth.
- Add nori and serve:
- Wrap each crisped onigiri with a strip of nori, tucking it around the middle so it fits snugly, and sprinkle sesame seeds over the top if you’re feeling fancy. Let them rest for a moment, then enjoy warm or pack them for later—they’ll stay delicious at room temperature.
 Save
Save I’ll never forget the first time I tucked a warm onigiri into a lunchbox for a rainy-day hike—the steam had softened the nori just a bit, and with each bite I tasted the care and intention behind even the smallest detail. Sometimes it’s these little rituals that turn a meal into a tiny celebration.
Making It Yours: Swaps and Add-ins
The first time I swapped in canned salmon for fresh, I discovered it works in a pinch—though fresh-cooked always feels a bit more special. Adding a dab of wasabi or pickled plum alongside the salmon turns each bite into an adventure. Sometimes I sneak in a few chopped shiso leaves for freshness that wakes up the whole dish.
Troubleshooting Onigiri Woes
The rice sticking to my hands used to frustrate me until I learned that damp, salted palms are the home cook’s secret weapon. If your onigiri keep crumbling, chances are the rice is too cold or too dry—warm, slightly tacky grains are your friend. Don’t hesitate to mold each rice ball gently but thoroughly so the filling stays hidden.
Serving, Storing, and Pairing Ideas
Onigiri shine in bento boxes, paired with crisp pickles and a flask of hot green tea. They also hold their own on breakfast tables or as a nourishing snack after a long walk. Try packing them with miso soup for that little extra hug on cool days.
- Keep nori sheets separate until ready to eat for crispness.
- Room-temp onigiri taste best within a few hours of shaping.
- Store leftovers tightly wrapped to keep the rice moist.
 Save
Save May these little rice bundles bring you the same comfort and pride they’ve brought me—sometimes a simple, handmade snack can turn any day around.
Recipe Guide
- → How do I keep rice from sticking to my hands when shaping?
Keep a small bowl of water nearby and wet your hands before handling rice; rub a pinch of salt into your palms to season and help prevent sticking. Work with warm rice and shape gently rather than compacting too hard.
- → Can I use canned salmon instead of fresh?
Yes—drain and flake canned salmon, then season with soy, mirin, and a little sesame oil to boost flavor. Fresh grilled salmon gives the best texture, but canned works well for convenience.
- → What type of rice is best for onigiri?
Short-grain Japanese rice yields the ideal sticky, slightly glossy texture that holds shape when molded. Rinse until the water runs clear, cook to tender-stickiness, and let rest before seasoning.
- → How do I get a crisp, golden exterior without overcooking the filling?
Use a lightly oiled nonstick skillet over medium heat and cook 2–3 minutes per side until golden. Press gently while searing so the onigiri holds together; brushing soy sauce just before flipping adds color and flavor without drying the interior.
- → How should I store and reheat leftover onigiri?
Store cooled onigiri wrapped in plastic in the refrigerator for up to 24 hours. Reheat in a skillet over low-medium heat to restore crispness, or warm briefly in an oven; avoid extended microwave heating to prevent gummy rice.
- → What are tasty variations or additions to the filling?
Try adding a dab of wasabi, pickled plum (umeboshi), chopped scallions, or a touch of Japanese mayonnaise to the salmon. Sprinkle with toasted sesame seeds or furikake for extra texture and umami.